-For women, there are 3 layers: underwear, kosode and uchikake. The underwear is the white kosode and red hakama mentioned previously. The kosode (same construction as the white one) is worn on top of the hakama and belted with the obi. The fabric can be decorated or plain but colored. The uchikake is the unlined, unbelted coat that goes on top of everything else.
-For men, both the underwear kosode and regular kosode are tucked into the hakama and all is belted with an obi. This is the basic clothing style; there are other pieces that can be added on top. One such layer is the kataginu, which is basically a vest. Its construction will be explained later.
-Obis can be plain and colored to suit your tastes. Cotton obis should be stiffened with a demin insert (explained later). Silk brocade is very nice, but obviously a bit more expensive.
Basic Kosode
-This is for the underwear kosode for both men and women. Later I will explain how to adapt this to other layers.
-Fabric requirements (for 45” wide fabric): 1 yard for sleeves + 2 times your shoulder to floor measurement. For example, I am 5’4” tall (56 inches from shoulder to floor) and I buy 4 ½ yards with usually about 4-6 inches left over. Kitakaze-sama buys 4 yards and his garments fall somewhere between his knees and the floor. For women the length of the underwear layer isn’t as important as it will be tucked into the hakama. It should go at least mid-calf, however, to make sure it stays tucked in properly.
 Kosode cutting plan
-It is time-consuming but helpful to pull threads to mark out cutting lines. That way you can lay out all the cuts without actually making them, and it helps you stay organized considering that you’ll end up with a pile of different-sized rectangles.
1. Square off the ends and measure 36” from one of them. If you’re not pulling threads, cut this piece out and measure a 14” wide strip from one selvage and a 14” strip from the other to make the sleeves. Having the selvage is nice because if you put that on the end of the sleeve, you don’t have to hem it.
2. On the remaining fabric, measure and cut a 14” strip from one edge and a 28” strip from the other. The 28” piece will become the body and the 14” piece will become the collar and the front panels.
3.Take the 14” piece and cut it in half the long way so you have two 7” wide strips, one containing the selvage. Take the selvage piece and cut in half the short way so you have two 7” wide pieces, each half the length of the body piece. These panels will be sewn onto the body piece in a few steps.
4.Fold the other 7” piece (the long one without the selvage) in half the long way and iron it that way. This is the collar.
5.Find the center of the body piece by folding it in quarters and marking the spot. Go from the center and cut down to the 28” edge (the long way).
6.Sew the 7” panels to the inside cut edges, keeping the selvages on the side away from the seam, once again to reduce hemming. You don’t have to sew all the way up to what will become almost the back of the neck—leave 3” or so on that end because it will be cut off in the next step anyway.
7. Cut the neckline: fold the body piece in half along the long side and pull the panels out so that they stick out from the garment, as shown:
 Neck cutting
 Make sure the seams are lined up, otherwise the front of the kosode will be lopsided.
Use the template provided to trace the neckline.
8. Sew the collar onto the neckline and finish the seams.
9. Sleeves: Center the sleeves along the edge of the body by folding the body and sleeves in half, the sleeves the short way so they are 14 inches long and 18 inches “tall”. Sew the sleeves to the body and finish the seams. Once again, sew the sleeves so that the selvages are at the wrist end and no hemming will be required.
10. Place right sides of the fabric together and line up the bottom edges of the sleeves and sides of the body.
11. Measure 3 inches up from the bottom corner of the sleeve and mark the spot, then measure 3 inches in from that same bottom corner and mark that. Draw a smooth curve connecting the marks and making a curved end to the sleeve.
12. Measure halfway up the outside (selvage edge) of the sleeve and mark that. This will mark the bottom edge of the sleeve.
13. Sew from this mark, around the sleeve and down to the bottom of the kosode.
14.Hem the bottom edge. For the underwear layer, set the hem somewhere between your knees and the floor.
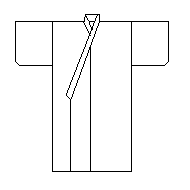
The finished garment should look like this:
 Kosode
 Other kosode, besides the underwear layer:
The only differences are in the neckline and sleeves. If you imagine putting these things on in layers, in order to keep them laying nicely you have to make the neckline a little bit bigger and, for women, the sleeves a little deeper so they layer nicely. Take the neckline pattern you made for the underwear kosode and trace it out just ¼” bigger when tracing the outer kosode necklines. For women's outer kosode, instead of measuring 36 inches for the sleeves, measure 37 ½ inches. All men's kosode have 36" sleeves.
Uchikake (for women only):
Make an outer kosode, but do not make the 7-inch panels. Cut the neck 1/4" bigger than you did for the outer kosode, and cut the sleeves 39" long to make room for the other kosodes. Put all the pieces together in the same way as for a kosode, but skip the 7-inch panels. For this reason, they are actually easier to sew than the kosode. You can also have a little more length in this garment if you wish. It makes a nice train that you usually won’t step on.
Kataginu (for men only):
Fabric: trigger or some other stiff fabric. The length should be about two yards--it gets tucked into the hakama, so make it at least long enough to go to mid-thigh.
1. Cut a 14" strip off each side of the fabric and sew the cut edges together along half the garment. The unsewn half will form the front of the vest.
2. Cut a 7" strip off the remaining fabric, fold it in half the long way and iron it down to make the collar.
3. Use the same neckline pattern as for the kosode, but make it 1/4" bigger than the one for the outer kosode. Do not angle the cut back to the front edge, but instead run it straight down the front so you end up with a U-shaped cutout. Sew the collar onto the body.
You're done! You should end up with a sleeveless vest that you tuck into the hakama. The shoulders should stand out straight; use starch if necessary. The big-shoulder look is very Japanese, at least in that time period.
Obi
Fabric: The length should be enough to go around your waist twice with enough left over for tying, at least 24 inches. Kitakaze-sama uses 3 yards. Buy this length of heavy denim, washed.
The same length of cotton, silk or some other reasonably durable fabric.
1. Cut a 3 ½ inch strip off the denim. This piece will go inside the obi to stiffen it.
2.Cut an 8-inch strip off the obi fabric.
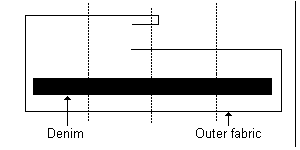
3. Lay the 8-inch strip out flat, right side down, and lay the denim on top of it so that 2 ¼ inches of the outer fabric show above and below the denim.
4. Fold the outer fabric over the denim, tucking the raw edges under ¼ inch and overlapping the outer fabric so you can sew it all down with one seam. Iron this in place before sewing.
 Obi cross-section
 5. Sew one seam down the middle of the obi, then sew two more seams, dividing the obi into fourths. This helps stiffen it and keep the denim in place
6. Tuck in the ends and finish—you’re done!
Hakama
Fabric: Cotton, trigger, silk or satin, 45” wide
Buy enough for 2 times your waist to floor measurement + 14 inches + hem.
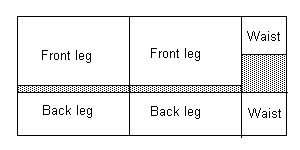
 Hakama cutting plan
 1. Square up the ends and cut 14 inches off one end so you have a 14 by 45 inch piece.
2. As with the kosode, cut a 14 inch and a 28 inch piece. Cut these in half the short way so you have two 14-inch and two 28-inch pieces, each piece having one selvage. This will come in handy later for hemming.
3. Sew a 14- and 28-inch piece together, selvages together, but leave 16 inches unsewn at one end. Do the same for the other two large pieces. The unsewn section will become the top of the hakama.
4. Now match up the two 14-inch pieces and sew them from the top down for 18 inches. This distance is variable depending on your preferences. It is supposed to be low, making the hakama baggy. If you don’t make the crotch low enough, the hakama will hang strangely and be very uncomfortable. Because of the unsewn side pieces, it makes for a very odd profile, so don’t go less than 18 inches down.
5. Sew the 28-inch panels together, also for 18 inches or so, just make it match the 14-inch panels.
6. Now make the legs by stitching the 14-and 28-inch panels together along their cut sides. You may choose to put a diamond gusset in the crotch; without it the four panels meet in the middle and this can rip pretty easily. Even with the low crotch, this is a stressful area and the construction doesn’t help. We’d like to figure out exactly how the Japanese got around this, because they wouldn’t have put up with their clothes ripping all the time.
7. Now you have one very baggy pair of pants with no waistband. You will fix this by cutting out the waistband pieces and pleating the hakama. Use the 14-inch piece you cut off in step 1. Trim this into two 14x14 inch pieces. Fold each piece in half and iron in the crease. Unfold the piece and fold the edges parallel to the crease into the center crease. You'll have a 14x7 inch waistband at this point; iron in the two new creases. Fold the remaining raw edges in 1/2 inch and iron them in place.
8. Now, the pleating. The back piece is pleated like so:
 Hakama back pleating
 The front piece is a little trickier. There needs to be four pleats on each side of the center seam and the overall width of the front after pleating needs to be 14 inches. Do the math so that the pleats are all close to the same width, though it may not work out perfectly. That’s OK. Pleat like so:
 Hakama front pleating
 These will, of course, lie flat when you pleat them.
Make two sets of ties:
--the first set goes on the back waistband and has to go around your waist to tie in the front
--The second set are sewn to the front waistband and have to go around your waist, across the back waistband and back around the front to tie in a bow.
Self-fabric tubes work well and are comfortable. I make mine about ½-inch thick when finished, but do whatever works best for you.
10. Fold the waistband pieces in half the long way along the creases you made earlier, surrounding the top ½-1 inch of pleat. Place the ends of the ties into the edges of the waistband. Sew across the bottom of the waistband and the top of the pleats to hold them in place. Also sew up the edges to secure the ties:

11. You should now have one very baggy pair of pants that will at least tie around your waist. The unsewn parts on each side are intentional.
12. Hem the bottom so the hakama just touch the floor.
So how do I wear this stuff?
First, all kosode are worn the same way, whether or not they are underwear. Wrap the right-hand panel across your body, then the left-hand panel on top of it. The panels should wrap around past your hip bone so that they stay in place. The Japanese only wrap the right panel over the left on dead people, so don’t do that.
Women
-Wear the white kosode under the hakama and tie the hakama on, tucking the ties under the waistband. You are now in your underwear.
-The top kosode goes on over the hakama and is held on by the obi. Wrap the collar reasonably snug up against your throat because it's improper to show anything below your neck.
-The obi is worn at your natural waist. There are many ways to tie an obi, but I only know this simple one: starting at your navel, wrap the obi clockwise around your body. When you get to the end, tuck it behind the wrapped obi and pull it snug, leaving a small tail sticking out from behind the obi. This should stay nice and snug.
-The uchikake goes on over everything else. In less formal occasions (like at home or around camp), you can take off the uchikake.
Men
-Tuck both underwear and outer kosode into the hakama, tucking the ties behind the waistband. If you're also wearing a kataginu, tuck it into the hakama so that its collar lies along the same lines as the kosode. You should be able to see the collars of both kosode under that of the kataginu. Remember to wrap the left panel over the right, even on the kataginu. The obi goes over the hakama waistband. Ask Kitakaze-sama about how to tie them; I’ve never done it.